


Stenciled Mugs!
Stenciled Mugs!

Today I'm honored to be doing a Guest Post over on Julie Fei-Fan Balzer's Blog. Julie is featuring different artists and crafters and how they use stencils in all sorts of different ways. This was my contribution! I've been a fan of Julie's for several years now and her work has inspired several posts here on my blog like this one about my color wheel, these two (#1 and #2) about rubber stamping and several posts about my time in her 30 Days In Your Journal class. If you're a regular reader of my blog (Hi Dad!) please check out Julie's site. If you're a regular reader of Julie's site - welcome. Pop back on 12/12 when I'll have an exciting winter project announcement!
Hi everyone. I’m Kara Monroe. I’m so excited to be here – thanks to Julie for allowing me and all of the other guest bloggers to be here – I’ve loved reading about and seeing all the amazing ways folks use their stencils and all the gorgeous art that’s being created. I have a super simple crafty art project to share with you that if you’ve been on Pinterest (who isn’t these days?) you’ve probably seen – and I’m adding a stencil-y twist. We’re going to stencil mugs!
I love projects that are quick and that allow you to customize something to perfectly meet your needs. These make a great gift and can also be used as decoration/home décor. For Christmas, you might drop in a Starbucks gift card or add a jar of hot chocolate mix in a small basket.
So, the first thing you need to do is gather supplies. The great thing about this project is that the cheaper the mug you use – the better! After you draw/stencil on the mug you’re going to bake the mug. The glaze on the mug “melts” during that process and the ink or paint from your pen melds with it. So, head to the dollar store or Wal-Mart and find their open stock ceramic mugs and grab a couple – or 10! You could also do this on bowls, plates, etc. but Sharpies are NOT food safe so keep that in mind – don’t decorate an area that will later hold food or liquid.
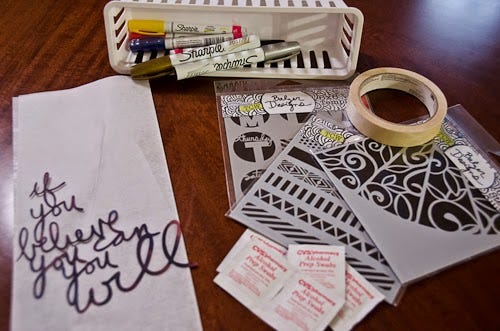
In addition to your mug (or other vessel), you’re going to need the stencils or masks that you want to use, some rubbing alcohol (I used little prep wipes), some masking tape to hold the stencil in place, and your Sharpie paint pens – oil based ones, the water based tend to wash right off in my experience. While it’s not required, I also think it’s easiest to also have regular sharpies in the same colors as your paint pens – I’ll explain why in a minute. I also keep a piece of scrap paper nearby so I can get my paint pen flowing smoothly before I touch my mug.

Figure out where and how you want to place your design. If you’re designing a mug for a lefty and you’re a righty – don’t forget that they may want the handle on the opposite side that you do – and vice versa! Clean the area you plan to decorate with the rubbing alcohol and let it dry.

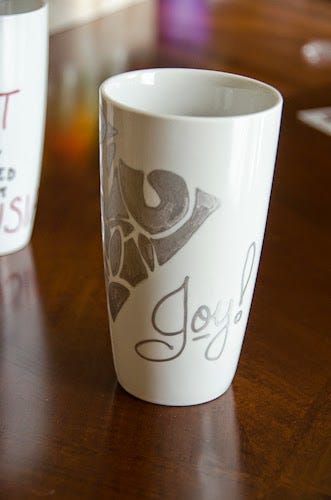
Next, you want to tape your stencil in position on the mug. I usually find this to be the step that can be the most challenging – especially if you’re using a mug that has a rounded surface. Use masking tape to adhere the mug to the surface. Take the extra time to get the stencil positioned exactly where you want it and make sure it’s as straight or as crooked as you want! I used Julie’s Mini Flower Quarter stencil for this one.
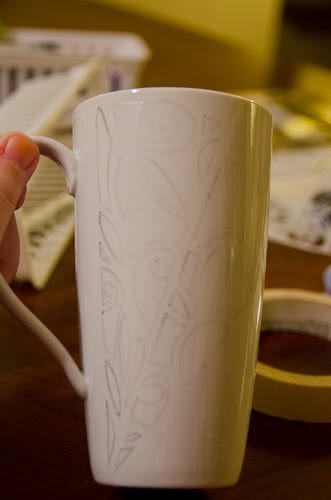
The hard part’s over – and now it’s time for fun – and my first tip. Don’t trace your design with the paint marker. Trace around the design with a regular Sharpie in the same color as the paint marker(s) you’re going to use. If you try to trace the stencil with the paint pen the paint will just bleed everywhere. After you’ve traced the design you can remove the tape and the stencil. Your mug should now have clear lines you can color in.
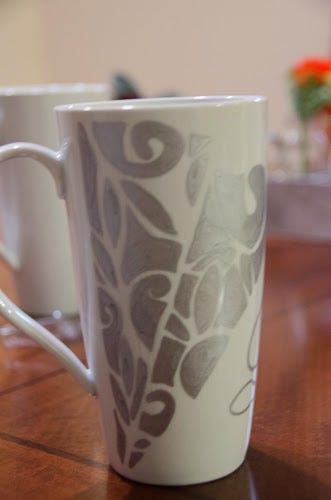
And now – color! This is where your creativity can really take flight. For this mug I really just wanted sparkle so the more silver the better. If you want to vary the thickness of lines you can use regular sharpies to give you thinner lines and then the paint markers to fill in larger sections – that would give you a lot of different design options – and the regular sharpies will hold right along with the paint pen – I just find they don’t hold up to a dishwasher as well. I’ve also done a couple where I filled areas with dots, hashes, and other pattern so you don’t have to use all solid color. This is the part where you get to get creative. Just be sure to get your paint pen flowing well on your scrap paper before you start to draw on your mug.
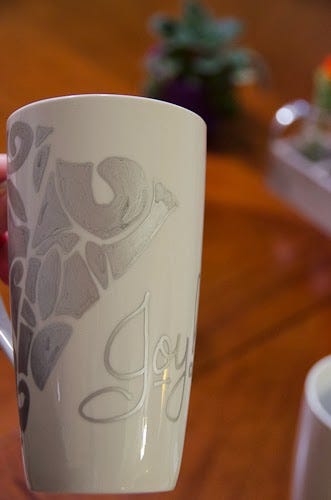
You can also add lettering if you want. I chose just to add the simple word Joy to this mug for the holiday season. You could add different colors, add other little doodles or drawings of your own – anything you want. Be a minimalist or go crazy – it’s up to you! Just don’t forget to sign your work (I tend to sign on the bottom.)
Let the paint dry – I tend to let it dry overnight but you certainly don’t have to wait that long – 20 minutes is probably more than enough. Put your mug or mugs on a baking sheet and place in a cold oven. Turn the oven on to 425 degrees. Once the oven reaches 425 you need to let the mugs bake for about 30 minutes. Watch them and if they start to brown on you, turn off the oven immediately. Otherwise, you can let them back for up to 40 minutes but 30 works for me. I turn the oven off at 30 minutes and then let them cool for several hours (or overnight – which is what I usually do). Ovens vary a lot and if you read all the different versions of this project on Pinterest you’ll find loads of different instructions for baking so if my instructions don’t work for you it may be that you need to adjust and use a lower temperature for a longer time.

An additional tip – if you make a mistake, both regular Sharpies and the Sharpie paint markers will wipe off with rubbing alcohol if you get to them quickly. That’s one of the reasons I like those little prep pads – I can work in a smaller space with those. A Q-tip dipped in rubbing alcohol would also be great if you wanted to get super detailed. You can see below that the mistake inside the S is cleaned up.

What a great way to celebrate the weekend than drinking out of a mug commemorating it!
Supplies:
Ceramic Mug
Your favorite Balzer stencil
Sharpies in desired colors
Sharpie Paint Markers in desired colors
Masking Tape
Rubbing Alcohol
Scrap Paper
I hope this inspired you to do some of those cool projects that you’ve seen – whether on Pinterest or something else. It’s great to see the inspiration but it’s even better to act on it. My friends regularly send me pins to make for them because I don’t just Pin – I do!
Bio

My name is Kara Monroe. I started my blog – I Wanna Be Me When I Grow Up – to share all about how I explore and enjoy life. I love sharing about what I’m cooking, crafting, and photographing online. I’ve been crafting since I was a little girl – sitting in my grandma’s sewing room making things with pins and beads or left over fabric scraps. That early start fed over into a love of crochet and cross stitch. I added in scrapbooking and photography somewhere in the middle and continue to cultivate a lifelong passion for cooking that I got from my mom. In the last few years I’ve started trying my hand at more artistic things like drawing and painting. I regularly share on Instagram and my Blog. When I’m not working or crafting I’m hanging with family and friends or writing about technology or traveling to far off places! I’d love to connect with you.
Online Links:
Blog: http://iwannabemewhenigrowup.blogspot.com
Instagram: http://instagram.com/kicki22